
Learn how to build an iPhone calculator-style using HTML, CSS, and JavaScript. This step-by-step guide includes a sleek UI design and full source code to help beginner developers create a functional and stylish calculator.
① Introduction
Hello Everyone, In today’s tutorial we will create a fully functional iPhone-style calculator that utilizes only HTML, CSS, and JavaScript. We are looking to replicate the clean, modern design of the iOS calculator and to also gain an understanding of how the logic behind each button works. You should be able to perform basic math functions such as addition, subtraction, multiplication and division – similar to a real application.
At the completion of this tutorial you will have a calculator operating on your screen as well as an understanding of how to create all parts of it from scratch. This is a fantastic “hands-on” tutorial for beginners that want to enhance their JavaScript skills as well as provide knowledge of creating a user interface (UI) structure. It is also a great portfolio ready project for you to showcase.
② Why Build This Project?
Although it may seem easy at first, building a calculator can be one of the most fun and educational beginner-friendly project to learn about real-world JavaScript. Building a calculator allows you to see how users enter information into your application, how the screen updates dynamically as they do so, how the calculation happens when they press “=” and how you put it together for a clean, organized user interface (UI).
This project is very useful too because you are creating an interface that millions of people use every day on their iPhone. As you become familiar with how it was created behind-the-scenes you will have much more confidence in creating other applications such as currency converters, note-taking apps and possibly mini dashboards.
If you are still getting used to HTML, CSS, and JavaScript, this would be a great way to continue learning and adding to your portfolio while completing something that can be finished in less than one hour.
③ What You’ll Learn
By building this iPhone-style calculator, you’ll learn how to:
- Create a UI with HTML
- Style it like a real iOS app with CSS
- Program calculator logic with JavaScript
- Handle button clicks and live results
- Format numbers like a real device
④ Project Setup
To get started, first create a new folder and name it “iPhone Calculator”. Inside that folder, add three files:
index.html
style.css
script.js
This simple structure keeps everything neat and makes your code easier to maintain as we build the UI, apply styling, and add interactivity step by step.
⑤ HTML Code
Alright, let’s move into the HTML structure of our calculator.
We’ll start by building the main layout that holds the display screen and all the buttons.
Perfect! Let’s break this HTML down section by section so it’s easy to understand:
HTML Boilerplate
<!DOCTYPE html>
<html lang="en">
<head>...</head>
<body>...</body>
</html>- Declares HTML5 document and sets the language to English.
<head>contains meta info, title, and links to CSS.<body>is where all the visible content lives.
Calculator Wrapper
<div class="calculator-wrapper">...</div>- Main container for the entire calculator.
- Centers the calculator on the page and applies background, padding, and rounded corners.
Display Screens
<p id="inputDisplay" class="input-display"></p>
<p id="resultDisplay" class="result-display"></p>inputDisplay→ shows the numbers you type.resultDisplay→ shows the calculated result.- Both styled for large, clear, iPhone-style text.
Button Grid
<div class="button-grid">...</div>- Holds all calculator buttons in a neat grid.
- Uses grid layout for equal spacing.
Buttons
<button class="button-gray" onclick="calculator('C')">C</button>
<button class="button-orange" onclick="calculator('+')">+</button>
<button class="button-zero" onclick="calculator('0')">0</button>- Gray buttons → functions like C (clear), +/-, %.
- Orange buttons → operations like ÷, ×, +, -.
- Zero button → spans 2 columns for larger width.
onclick="calculator('input')"→ triggers JavaScript function for operations.
This is full code copy and paste your Enviroment Visul Studoo Code
<!DOCTYPE html>
<html>
<head>
    <meta charset="UTF-8">
    <meta name="viewport" content="width=device-width, initial-scale=1.0">
    <title>Codeweave24 - iPhone Calculator</title>
   <link rel="stylesheet" href="style.css">

   </head>
<body>

<div class="calculator-wrapper">
    <p id="inputDisplay" class="input-display"></p>
    <p id="resultDisplay" class="result-display"></p>

    <div class="button-grid">
        <button class="button-gray" onclick="calculator('C')">C</button>
        <button class="button-gray" onclick="calculator('+/-')">+/-</button>
        <button class="button-gray" onclick="calculator('%')">%</button>
        <button class="button-orange" onclick="calculator('÷')">÷</button>
        <button onclick="calculator('7')">7</button>
        <button onclick="calculator('8')">8</button>
        <button onclick="calculator('9')">9</button>
        <button class="button-orange" onclick="calculator('×')">×</button>
        <button onclick="calculator('4')">4</button>
        <button onclick="calculator('5')">5</button>
        <button onclick="calculator('6')">6</button>
        <button class="button-orange" onclick="calculator('-')">-</button>
        <button onclick="calculator('1')">1</button>
        <button onclick="calculator('2')">2</button>
        <button onclick="calculator('3')">3</button>
        <button class="button-orange" onclick="calculator('+')">+</button>
        <button class="button-zero" onclick="calculator('0')">0</button>
        <button onclick="calculator('.')">.</button>
        <button class="button-orange" onclick="calculator('=')">=</button>
    </div>
</div>
<script src="script.js"></script>
</body>
</html>
⑥ CSS code
Perfect! Let’s make your iPhone-style calculator look sleek and modern with CSS. I’ll explain it section by section to understand.
Global Styles
* {
  margin: 0;
  padding: 0;
  box-sizing: border-box;
  font-family: -apple-system, BlinkMacSystemFont, "Segoe UI", Roboto, sans-serif;
}

body {
  background: #f7f7f7;
  display: flex;
  justify-content: center;
  align-items: center;
  height: 100vh;
}- Resets default browser styles.
- Centers the calculator in the viewport.
- Uses clean, system fonts for a modern look.
Calculator Wrapper
.calculator-wrapper {
  background: #000;
  width: 100%;
  max-width: 400px;
  border-radius: 50px;
  display: flex;
  flex-direction: column;
  align-items: center;
  padding: 20px;
}- Dark background for sleek iPhone-style look.
- Rounded corners for smooth design.
- Flex layout aligns display and buttons vertically.
Display Screens
.input-display, .result-display {
  width: 100%;
  color: #fff;
  text-align: right;
  padding: 0 20px;
  word-break: break-all;
}

.input-display { font-size: 3rem; }
.result-display { font-size: 4rem; }- Right-aligned text like real calculators.
- Larger font for results, smaller for input.
Button Grid
.button-grid {
  display: grid;
  grid-template-columns: repeat(4, 1fr);
  gap: 10px;
  padding: 10px;
}- Creates a neat 4-column layout for buttons.
- Equal spacing between buttons.
Buttons
button {
  border-radius: 50%;
  width: 80px;
  height: 80px;
  font-size: 2rem;
  border: none;
  cursor: pointer;
  transition: 0.2s;
}

.button-gray { background: #A5A5A5; color: #000; }
.button-orange { background: #FF9500; color: #fff; }
.button-zero { grid-column: span 2; border-radius: 40px; }
button:active { opacity: 0.8; transform: scale(0.95); }- Gray → function buttons.
- Orange → operations.
- Zero → wide button.
- Press effect to mimic real iPhone button touch.
Now this is full code in css copy and paste your enviroment.
* {
    margin: 0;
    padding: 0;
    box-sizing: border-box;
    font-family: -apple-system, BlinkMacSystemFont, "Segoe UI", Roboto, sans-serif;
}

body {
    background-color: #f7f7f7;
    display: flex;
    justify-content: center;
    align-items: center;
    height: 88vh;
    margin: 0;
}

.calculator-wrapper {
    display: flex;
    flex-direction: column;
    justify-content: center;
    align-items: center;
    width: 100%;
    min-height: 50%;
    max-width: 400px;
    background-color: #000;
    margin-top: 50px;
    border-radius: 50px;
}

.input-display {
    width: 100%;
    height: 15vh;
    padding: 0 20px;
    color: #fff;
    font-size: 3rem;
    display: flex;
    justify-content: flex-end;
    align-items: flex-end;
    word-break: break-all;
}

.result-display {
    width: 100%;
    height: 15vh;
    padding: 0 20px;
    color: #fff;
    font-size: 4rem;
    display: flex;
    justify-content: flex-end;
    align-items: flex-start;
    word-break: break-all;
}

.button-grid {
    display: grid;
    grid-template-columns: repeat(4, 1fr);
    gap: 10px;
    padding: 10px;
}

button {
    width: 80px;
    height: 80px;
    border-radius: 50%;
    background-color: #333;
    color: #fff;
    font-size: 2rem;
    border: none;
    cursor: pointer;
    transition: background-color 0.2s;
}

button:active {
    background-color: #555;
}

.button-gray {
    background-color: #A5A5A5;
    color: #000;
}

.button-gray:active {
    background-color: #C5C5C5;
}

.button-orange {
    background-color: #FF9500;
    color: #fff;
}

.button-orange:active {
    background-color: #FFB84D;
}

.button-zero {
    grid-column: span 2;
    width: 100%;
    border-radius: 40px;
    text-align: left;
    padding-left: 30px;
}
⑦ Adding Functionality with JavaScript
Perfect! Now let’s make your iPhone-style calculator actually work using JavaScript. I’ll break it down section by section.
Grab the Display Elements
let display = document.getElementById("inputDisplay");
let result = document.getElementById("resultDisplay");- These lines connect your JS to the HTML screens.
display→ shows what the user types.result→ shows the calculation result.
Clear and Reset
if (input === "C") {
    display.innerHTML = "0";
    result.innerHTML = "";
}- Resets the calculator to default when
Cis pressed. - Ensures no leftover numbers remain.
Toggle Sign
else if (input === "+/-") {
    if (display.innerHTML.startsWith("-")) {
        display.innerHTML = display.innerHTML.slice(1);
    } else {
        display.innerHTML = "-" + display.innerHTML;
    }
}- Flips positive numbers to negative and vice versa.
- Works like the real iPhone calculator’s
+/-button.
Calculate Result
else if (input === "=") {
    try {
        let calculated = eval(display.innerHTML.replace(/×/g, "*").replace(/÷/g, "/"));
        result.innerHTML = calculated.toLocaleString("en-US");
    } catch {
        result.innerHTML = "ERROR";
    }
}- Converts user input into proper math symbols.
- Uses
eval()to compute the value. - Shows
ERRORif the input is invalid.
Add Numbers and Operators
else {
    if (display.innerHTML === "0" && !isNaN(input)) {
        display.innerHTML = input;
    } else {
        display.innerHTML += input;
    }
}- Adds numbers and operators to the display.
- Keeps the input flowing naturally.
Initialize Display
window.onload = function () {
    display.innerHTML = "0";
};- Shows
0when the calculator first loads. - Matches real iPhone calculator behavior.
This is full code in Javascript copy and paste your Enviroment.
function calculator(input) {
    let display = document.getElementById("inputDisplay");
    let result = document.getElementById("resultDisplay");

    if (input === "C") {
        display.innerHTML = "0";
        result.innerHTML = "";
    } else if (input === "+/-") {
        if (display.innerHTML === "0") return;
        if (display.innerHTML.startsWith("-")) {
            display.innerHTML = display.innerHTML.slice(1);
        } else {
            display.innerHTML = "-" + display.innerHTML;
        }
    } else if (input === "=") {
        try {
            let calculated = eval(display.innerHTML.replace(/×/g, "*").replace(/÷/g, "/"));
            result.innerHTML = calculated.toLocaleString("en-US");
        } catch (err) {
            result.innerHTML = "ERROR";
        }
    } else {
        if (display.innerHTML === "0" && !isNaN(input)) {
            display.innerHTML = input;
        } else {
            display.innerHTML += input;
        }

        let numericValue = display.innerHTML.replace(/,/g, "").replace(/×/g, "*").replace(/÷/g, "/");
        if (!isNaN(numericValue)) {
            display.innerHTML = Number(numericValue).toLocaleString("en-US");
        }
    }
}

window.onload = function () {
    document.getElementById("inputDisplay").innerHTML = "0";
};
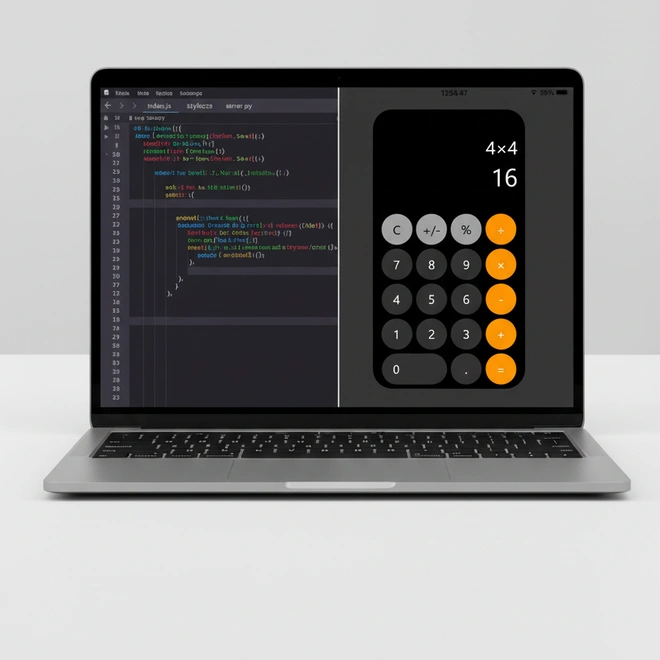
⑧ Final Output

This project that creates an iPhone-Style Calculator is a wonderful opportunity to see how HTML, CSS & JavaScript interact to create a functional application. In addition to structuring and styling the page (like the actual iPhone), you also developed logic which will allow the page to function as a real calculator. While simple in nature, this application is a lot more than a design. DOM Manipulation, Event Handling, and Dynamically Formatting Numbers are some of the things you’ve gained hands-on experience with. The next thing you can do is use this experience in your future web development projects to create a little more complicated applications and UI components.
⑨ FAQs
Is this iPhone calculator suitable for beginners?
Yes, this is a beginners project that is ideal for developing your front-end skills.
Do I have to use a framework like React or Vue?
No, the whole project works with standard HTML, CSS and Javascript.
Is this calculator suitable for mobile devices?
Absolutely − The design is responsive and fits well on mobile devices.
Is the logic the same as that used by a real iPhone calculator?
Yes, the functionality and usability is almost identical to the original iPhone calculator functionality, which includes operators and display.
Can I modify the design?
Of course you can! You can modify the colours and the animations and can also add features such as memory and dark mode.