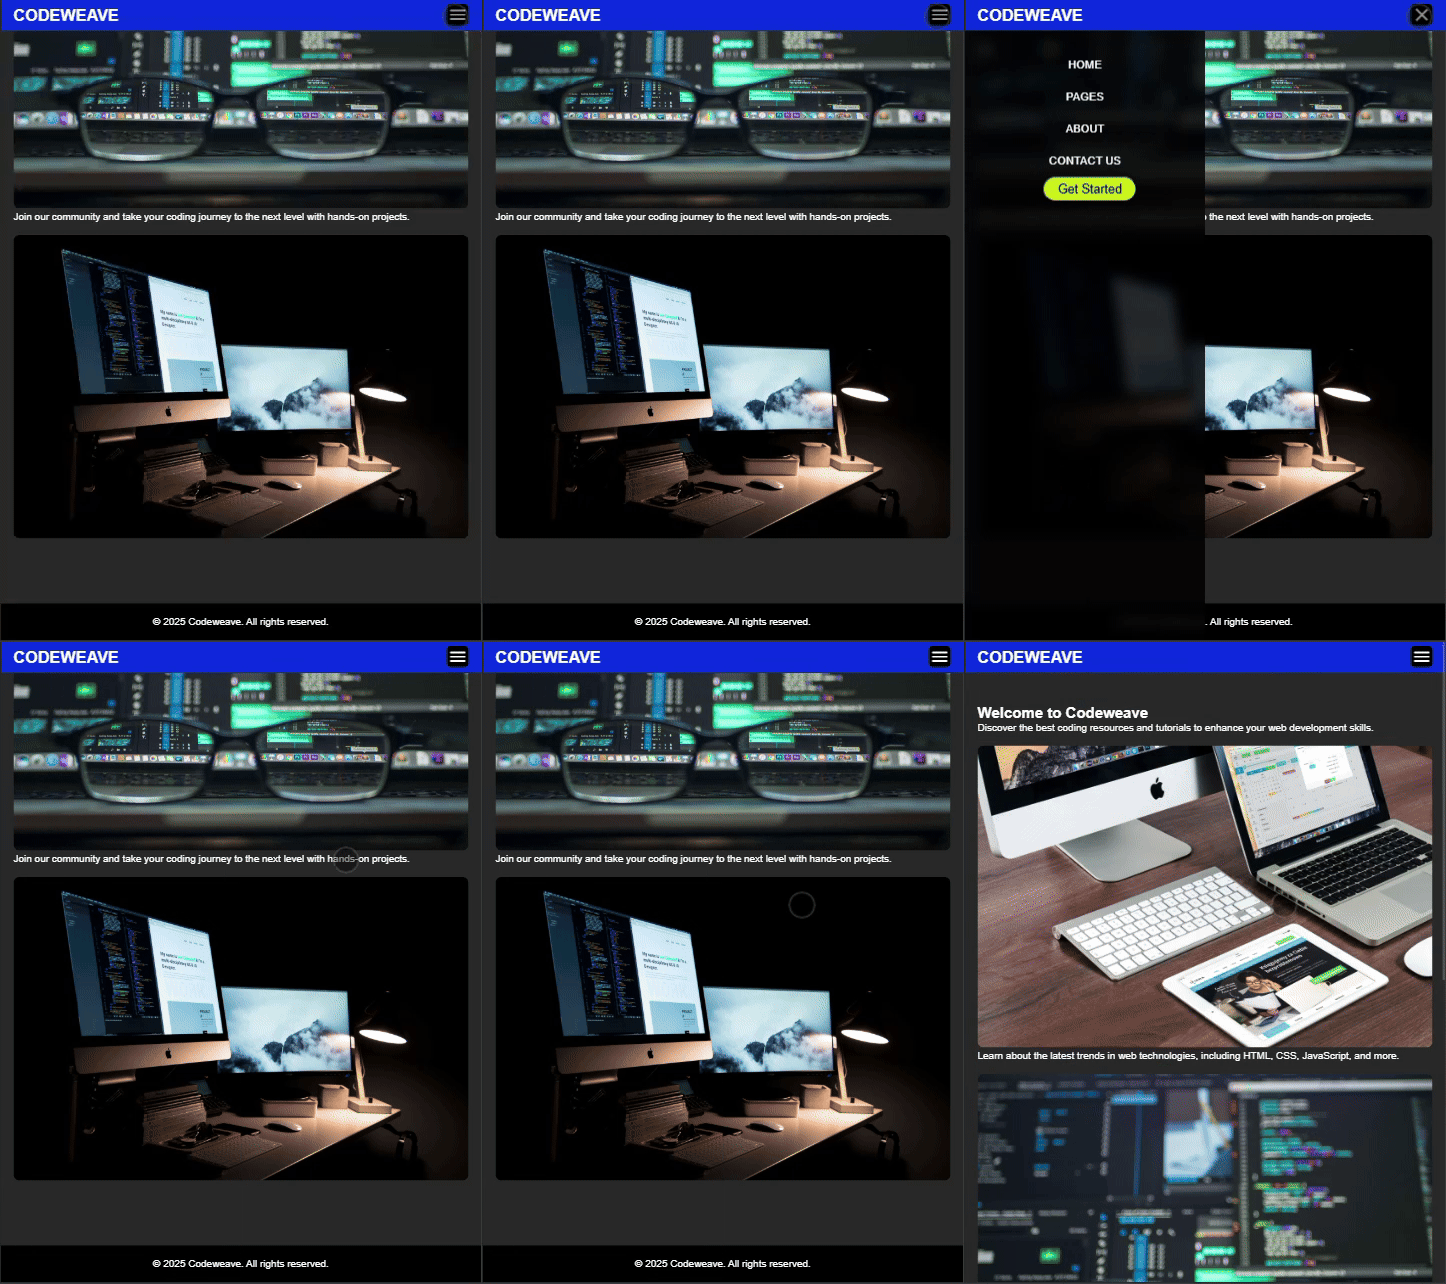
This beginner-friendly tutorial will guide you through creating a stylish responsive navbar using HTML,CSS and JavaScript. Step by step, you’ll learn how to design and build a navbar that looks great on any device.
Introduction
A responsive navbar is essential component of modern web design, allowing users to navigate a website seamlessly across different screen sizes. whether you’re building a personal blog, an ecommerce site or a business portfolio, a well-designed navigation bar enhances user experience and accessibility.
Why we use navbar
- Enhanced User Experience: Responsive design ensures that your website adapts to various screen sizes such as desktops, tablets and mobiles. This helps users to navigate easily of their devices.
- Mobile-Friendly Navigation: Always users accessing website in mobile devices so that you’ve a navbar that adjust it self smaller screens is essential.
- Customizability: Using HTML, CSS and JavaScript gives you to control fully over the appearance and functionality of the navbar.
Requirements
- Basic Knowledge: Understanding of HTML, CSS and JavaScript for structuring, styling and adding interactivity.
- Tools: A text editor(VS code, Sublime text and etc.)
- A modern web browser for testing such as Chrome, Firefox or others.
I hope you are ready. Let’s get started.
Step1: HTML code
<!DOCTYPE html> : Declares the document as HTML5 to ensure that the page is rendered with modern web standards.
<html lang=”en”>: Specify the language used in this HTML document(English).
<head>: Begins the head section where meta information, styles and scripts are defined.
<meta charset=”utf-8″>: Sets the character encoding to UTF-8 to ensure that special character are properly displayed.
<meta name=”viewport” content=”width=device-width, initial-scale=1.0″>: Makes the website responsive by setting the viewport to match the device width and initial zoom level.
<title>Codeweave – Responsive Hamburger</title>: Sets the page title displayed in the browser.
<link rel=”stylesheet” href=”style.css”>: Links to an external stylesheet for page styling.
</head>: Close the head section of the document.
<body>: Opens the body section where the visible content of the page will be written.
<header>: Defines the header section of the webpage which typically includes navigation and branding.
<nav>: Begins the navigation bar to hold links to the important pages of the site.
<div>Codeweave</div>: Display the site logo or name.
<ul id=”ul”>: Starts an unordered list to hold the navigation menu.
<li><a href=”#”>HOME</a>
</li> <li><a href=”#”>PAGES</a>
</li> <li><a href=”#”>ABOUT</a>
</li> <li><a href=”#”>CONTACT US</a></li>: Creates list items which clickable for different pages(Home, Pages, About and Contact Us ).
<button>Get Started</button>: Add a button labeled which link to a call action page.
</ul>: Close the unordered list for the navigation menu.
</nav>: Ends the navigation bar section.
<div id=”hamMenu” onclick=”hamMenuClick()”>: Create the hamburger menu icon that triggers a JavaScript function when clicked.
<div class=”line1″></div>
<div class=”line2″></div>
<div class=”line3″></div>: Adds three elements that will visually from the three lines of the hamburger menu icon.
</div>: Close the hamburger menu div.
</header>: Ends the header section.
<div>: Starts the content section of the page which include the main text and images.
<h2>Welcome to Codeweave</h2>: Display heading (h2) welcoming the visitors.
<p></p>: Display a paragraph.
<img src=”” alt=””>: Display an image.
</div>: Close the content section.
<div>: Start the footer section.
<p>© 2025 Codeweave. All rights reserved.</p>: Display a copyright notice for the website.
</div>: Close the footer section.
</body>
</html>: Closing the body and HTML tags marks the end of the document.
The complete code is waiting for you bellow-go ahead, start the building.
<!DOCTYPE html>
<html lang="en">
<!--coding by codeweave24-->
<head>
<meta charset="utf-8">
<meta name="viewport" content="width=device-width, initial-scale=1.0">
<title>Codeweave - Responsive Hamburger</title>
<link rel="stylesheet" href="style.css">
</head>
<body>

<header>
  <nav>
    <div class="logo">Codeweave</div> <!-- Add your logo here -->
    <ul id="ul">
      <li><a href="#">HOME</a></li>
      <li><a href="#">PAGES</a></li>
      <li><a href="#">ABOUT</a></li>
      <li><a href="#">CONTACT US</a></li>
      <button class="btn">Get Started</button>
    </ul>
  </nav>

  <div id="hamMenu" class="ham" onclick="hamMenuClick()">
    <div class="line1"></div>
    <div class="line2"></div>
    <div class="line3"></div>
  </div>
</header>
<div class="content">
    <h2>Welcome to Codeweave</h2>
    <p>Discover the best coding resources and tutorials to enhance your web development skills.</p>
    <img src="https://images.pexels.com/photos/39284/macbook-apple-imac-computer-39284.jpeg" alt="Coding">
    <p>Learn about the latest trends in web technologies, including HTML, CSS, JavaScript, and more.</p>
    <img src="https://images.pexels.com/photos/577585/pexels-photo-577585.jpeg" alt="Web Development">
    <p>Join our community and take your coding journey to the next level with hands-on projects.</p>
    <img src="https://images.pexels.com/photos/115655/pexels-photo-115655.jpeg" alt="Programming Community">
</div>

<div class="footer">
    <p>© 2025 Codeweave. All rights reserved.</p>
</div>

</body>
</html>Step2: CSS code
* {
    margin: 0;
    padding: 0;
    list-style: none;
    text-decoration: none;
    transition: 0.3s;
    -webkit-touch-callout: none;
    -webkit-user-select: none;
    user-select: none;
    outline: none;
}
Reset the default browser styles.
Adds a smooth transition effect to all elements.
Disable text selection to prevent accidental highlights.
body {
    font-family: 'Helvetica Neue', Helvetica, Arial, sans-serif;
    background-color: #ffffff;
    color: #000;
}
Sets the font to a clean modern sans-serif style.
Uses a white background with black text for readability.
.ham {
    width: 35px;
    height: 35px;
    background: black;
    border-radius: 7px;
    display: flex;
    flex-direction: column;
    align-items: center;
    justify-content: center;
    z-index: 99;
    position: fixed;
    top: 6px;
    right: 20px;
    display: none;
}
Creates a hamburger menu button.
Uses flexbox to align the menu bars.
Positioned fixed at top-right corner.
Hidden by default and only appears on smaller screens.
.line1, .line2, .line3 {
    background: white;
    border-radius: 3px;
    width: 25px;
    height: 3px;
    margin: 2px;
}
Styles the three lines inside the hamburger menu.
.active .line1 {
    transform: rotate(-45deg) translate(-5px, 5px);
}
.active .line2 {
    opacity: 0;
}
.active .line3 {
    transform: rotate(45deg) translate(-5px, -5px);
}
when activated or clicked the hamburger menu transforms into an “X” shape.
header {
    width: 100%;
}
Ensures the header spans the full width of the screen.
nav {
    position: fixed;
    top: 0;
    left: 0;
    width: 100%;
    background: #0b2fe1;
    display: flex;
    justify-content: space-between;
    align-items: center;
    padding: 10px 20px;
    z-index: 98;
}
Fix the navbar at the top with a blue background.
Uses flexbox for proper alignment.
nav .logo {
    color: #fff;
    font-size: 26px;
    font-weight: bold;
    text-transform: uppercase;
}
Styles the logo with white color, bold and uppercase.
nav ul {
    display: flex;
    align-items: center;
    margin: 0;
    padding: 0;
    margin-right: 100px;
}
Positioning the navbar links horizontally with even spacing.
nav ul li {
    text-align: center;
    padding: 15px 20px;
}
Style each navigation item with spacing.
nav ul li:hover {
    color: #26A69A;
}
Changes link color to greenish-blue on hover.
nav ul li a::after {
    content: "";
    position: absolute;
    left: 0;
    bottom: -2px;
    width: 100%;
    height: 2px;
    background: #26A69A;
    transform: scaleX(0);
    transition: transform 0.3s ease-in-out;
}
nav ul li a:hover::after {
    transform: scaleX(1);
}
Adds a cool underline animation when hovering over links.
.btn {
    width: 150px;
    height: 40px;
    background-color: rgb(201, 229, 21);
    margin-left: 15px;
    border-radius: 20px;
    font-size: 20px;
}
.btn:hover {
    color: #FF6F61;
    background: #006F77;
}
Styles a call-to-action button with a rounded design and when hovering over button the background changes a teal color with red text.
.content {
    padding: 100px 20px 50px;
}
.content img {
    width: 100%;
    max-width: 100%;
    border-radius: 10px;
    margin-top: 20px;
    height: 100%;
    max-height: 50%;
}
Adds spacing and ensures images scale responsively.
.footer {
    background: #000;
    color: white;
    text-align: center;
    padding: 20px;
    margin-top: 50px;
}
Create a black footer with white text and centers everything.
@media (max-width: 768px) {
    .ham {
        display: flex;
    }
Show the hamburger menu on screens smaller than 768px.
  nav ul {
        position: fixed;
        left: -100%;
        top: 0;
        height: 100vh;
        width: 50%;
        background: rgba(0, 0, 0, 0.9);
        backdrop-filter: blur(10px);
        z-index: 999;
        flex-direction: column;
        justify-content: flex-start;
        margin-top: 49px;
        padding-top: 30px;
        align-items: center;
        transition: left 0.3s ease;
    }
Turns the navigation menu into a sidebar that slides in from the left.
Uses backdrop blur for a modern class effect.
    .link {
        left: 0;
    }
}
Makes menu visible when activated.
The complete code is waiting for you bellow-go ahead, continue the building.
* {
    margin:0;
    padding:0;
    list-style: none;
    text-decoration: none;
    transition: 0.3s;
    -webkit-touch-callout: none;
    -webkit-user-select: none;
    user-select: none;
    outline: none;
  }

  body {
      font-family: 'Helvetica Neue', Helvetica, Arial, sans-serif;
      background-color: #000;
      color: #ffffff;
  }

  .ham {
    width: 35px;
    height: 35px;
    background: black;
    border-radius: 7px;
    display: flex;
    flex-direction: column;
    align-items: center;
    justify-content: center;
    z-index: 99;
    position: fixed;
    top: 6px;
    right: 20px;
    display: none; /* Hide by default */
  }

  .line1, .line2, .line3{
    background: white;
    border-radius: 3px;
    width: 25px;
    height: 3px;
    margin: 2px;
  }

  .active .line1{
    transform: rotate(-45deg) translate(-5px, 5px);

  }
  .active .line2 {
    opacity: 0;
  }

  .active .line3 {
    transform: rotate(45deg) translate(-5px, -5px);
  }

  header {
    width:100%;
  }

  .link{
    left: 0%;
  }

  nav {
    position: fixed;
    top: 0;
    left: 0;
    width: 100%;
    background: #0b2fe1;
    display: flex;
    justify-content: space-between;
    align-items: center;
    padding: 10px 20px;
    z-index: 98;
  }

  nav .logo {
    color: #fff;
    font-size: 26px;
    font-weight: bold;
    text-transform: uppercase;
  }

  nav ul {
    display: flex;
    align-items: center;
    margin: 0;
    padding: 0;
    margin-right: 100px;
  }

  nav ul li {
    text-align:center;
    padding: 15px 20px;

  }

  nav ul li:hover{
      color: #26A69A;
  }
  nav ul li a::after {
          content: "";
          position: absolute;
          left: 0;
          bottom: -2px;
          width: 100%;
          height: 2px;
          background: #26A69A;
          transform: scaleX(0);
          transition: transform 0.3s ease-in-out;
      }
      nav ul li a:hover::after {
          transform: scaleX(1);
      }

  nav ul li a {
      position: relative;
      font-size: 18px;
      color: white;
      padding: 5px 0;
      transition: color 0.3s;
  }
  .btn{
    width: 150px;
    height: 40px;
    background-color: rgb(201, 229, 21);
    margin-left: 15px;
    border-radius: 20px;
    font-size: 20px;
  }
  .btn:hover{
      color: #FF6F61;
      background: #006F77;
  }

  .content {
          padding: 100px 20px 50px;
      }
      .content img {
          width: 100%;
          max-width: 100%;
          border-radius: 10px;
          margin-top: 20px;
          height: 100%;
          max-height: 50%;
      }

  .footer {
          background: #000;
          color: white;
          text-align: center;
          padding: 20px;
          margin-top: 50px;
      }

  /* Responsive Design */
  @media (max-width: 768px) {
    .ham {
      display: flex;
    }

    nav ul {
      position: fixed;
      left: -100%;
      top: 0;
      height: 100vh;
      width: 50%;
      background: rgba(0, 0, 0, 0.9);
      backdrop-filter: blur(10px);
      z-index: 999;
      flex-direction: column;
      justify-content: flex-start;
      margin-top: 49px;
      padding-top: 30px;
      align-items: center;
      transition: left 0.3s ease;
    }

    .link {
      left: 0;
    }
  }
Step3: JavaScript code
function hamMenuClick() : This function is triggered when the hamburger icon is clicked.
document.getElementById(“hamMenu”).classList.toggle(“active”); : Adds or remove the “active” class on hamburger icon triggering its animation.
document.getElementById(“ul”).classList.toggle(“link”); : Adds or remove the “link” class on navigation menu making it slide and out on mobile.
this code of java write bellow the footer in HTML code.
<script>
function hamMenuClick()
{
  document.getElementById("hamMenu").classList.toggle("active");
  document.getElementById("ul").classList.toggle("link");
}
</script>Final Output

Conclusion
In this tutorial, I covered how to create a stylish and responsive navbar using HTML, CSS and JavaScript. A well Designed navigation bar enhances user experience by ensuring seamless accessibility across different screen sizes. I structured the navbar using HTML, CSS and added interactivity with JavaScript, including a mobile friendly hamburger menu.
By following these steps, you’ll learn how to customize and enhance your navbar with advanced styling. Keep exploring and refining your design to create a navigation system that improves your website functionality and design.
I hope you found this tutorial helpful! If you did, consider sharing it with others who might benefit. Keep practicing, keep learning, and happy coding!


1 comment
[…] Also Read Responsive Navbar Using (1:HTML 2:CSS and 3:JavaScript). […]